
(This is a guest post, written by Ally Kraus.)
The Camera
Our recent headcams have used three types of camera. Each has
pros and cons. We started out with the MD-80 camera, and then moved on to Veho
cameras because they have a larger field of view and better image quality.
MD-80: You can find these cameras (and their knockoffs) on Amazon
and EBay. The MD-80s are cheap and very lightweight, and also come
with an accessory pack with a variety of mounts.
Veho Pro: The Pro is a more heavy-duty version of the MD-80. It has
much clearer indicator lights, nearly double the battery life, and the camera
also has a larger field of view. We have
had some problems with the audio in the video files (either with it being quite
noisy, or not synching with the audio) and also file corruption; different instances of the camera have had different issues. Also, the Pro does
not come with the mount we need to attach it to the headband, so we have cannibalized the MD-80 mounts we had used previously. Amazon link for the camera here.
Veho Atom: Very similar to the Pro (same pros/cons), the Atom is
smaller, and has about half the battery life. It does come with a headband
mount. On Amazon here.
Fisheye Lens: The only modification we’ve made to the cameras themselves
is to attach a fisheye lens to widen the field of view. We’ve used a simple
magnetic smartphone version, like this one. The lens comes with a ring you can attach to a surface for
the lens to adhere to. We attached ours with a ton of hot glue. (We’ve also
substituted regular washers from the hardware for the metal ring that’s
included.) The lens can be knocked off by kids, so you can also glue the
fisheye lens itself to the ring so it’s permanently on the camera.
Here is a comparison of the MD-80 and the Veho Pro, with and
without the fisheye:
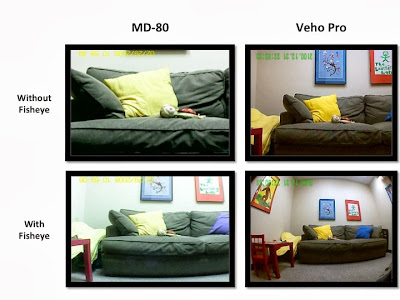

You can see that the field of view is dramatically different. The MD-80 without fisheye has a vertical field of view of about 22 degrees, while with fisheye it has a bit more than 40 degrees. The Veho is almost that good - around 40 even without the fisheye. It goes up to about 70 with the fisheye. The lenses on these cameras are not completely consistent, though, so we have found variance in our view measurements from camera to camera.
The Mount
Ideally, the camera lens would be situated in the center of
the child's forehead just at the brow line, to give a semi-accurate idea of
what the child can see. We wanted to have some ability to make adjustments; in
particular to angle the camera down if it were positioned too high, though, since some children find the camera distracting if it's too low on the forehead.
Both the MD-80 and the Atom come with an angle-adjustable
mount that pivots at one end. It's not ideal for our purposes because the lens
is on the opposite side from the pivot point (indicated by a circle). All my
diagrams use the MD-80 mount, although the Atom’s is similar, just smaller:

We really want the lens end to be right
above the pivot so it's low on the child's forehead. We remedied this by
unscrewing the two screws, flipping the camera holder upside-down, and
re-assembling it. It's doesn't fit quite as well this way (note the slight gap)
but it's fine and not going to budge:

You can buy a similar mount for the Pro
in a separate accessory package – unfortunately it is not included with that
camera. We ended up not buying the accessory kit, but simply modded some of our
existing MD-80 mounts to fit the Pro.
The Band
We modified some Coast LED Lenser 7041 6 Chip LED headlamp bands for our headcamera. The best thing about this headlamp is that it comes with some plastic hooks that fit the mount perfectly. We disassembled the headlamp, keeping only the band, the top strap, and two of the hooks. The band is designed for adults and ended up being too large for some children; we fixed this by pulling apart the seam, trimming the elastic a few inches, and re-sewing it. The top strap was also too small with the battery pack removed, so we kept the buckle and replaced the adjustable part of the strap with a longer piece of 1" Nylon Woven Elastic purchased from http://www.rockywoods.com/.
The hooks connect the mount to the
band. Slip the hooks into the bottom row of rectangular holes on the headcam
mount and snap them into place:

It helps to hot glue the mount to the
hook pieces, in order to stabilize the connection. You can then slip it on to
the headband:

Our headcams have a headstrap to keep
the camera snug on the child's head and also to prevent it from sliding/being
pulled down. We wanted to ensure that the back one especially would be comfortable
against the child's head.
For the front, we used a pipe cleaner.
(Easy to bend, and relatively soft/safe around children.) We threaded the
pipe-cleaner through the loop on the top strap (1). Then we threaded the ends
of the pipe-cleaner from the back to the front through the top rectangular
holes, then down along the sides of the camera (2). We twisted them together at
the bottom of the camera mount (3), and then threaded the ends back into the
hinge so there is no danger of them poking the child:

For the back, we picked the seam on the
back loop of the top strap, wrapped the end around the band, and sewed it in
place:

Finally, we added a little padding to
the inside-front of the strap so that the plastic hook pieces wouldn't rest
against the child's forehead. You can use the extra elastic from when you
shortened the band, and hot glue it to the plastic hook pieces:


Voila! The final headcam is as pictured at the top of the post. Please let us know if you find this useful or if you discover other good variants on our setup.
This comment has been removed by the author.
ReplyDelete